
Test and review of the “Composting Flowerpot”
A pot imagined to feed your plants with your peelings.
It's the Transfarmers' composting flowerpot, coming to market in September 2020.
A composting flower pot ?! And why not?
Transfarmers sent us their model to test it and let you know about it. The test is done, we had time to make an opinion and now, we tell you everything!

We will earn a small commission if you follow the links in this article to purchase from our partner.
The reception and installation of the composting flowerpot
The reception
The composting flowerpot is delivered by appointment in a cardboard box that protects it properly during transport.
Upon opening, the worm compost bin is cleverly wedged with 2 thick cardboard plates. I was wondering how the nice clay pot would arrive. It is finally very well protected, and we are quickly reassured when we open the package.
The cardboard packaging can be recycled in the worm composting bin to add carbon.

Inside the box are:

- the composting flowerpot ;
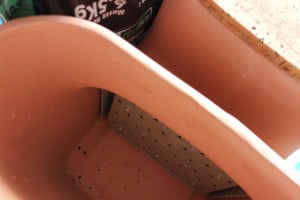
- the separation grid to be inserted between the 2 parts of the pot ;
- 2 cork stoppers with a seal ;
- a protective tray to put the composting flowerpot ;
- a user guide ;
- a little gift from the Transfarmers: a peeler that will make nice peelings for the worms !
Assembly
The assembly of the composting flowerpot is very simple because it is composed of few elements.
The grid must be placed between the flowerpot and the worm compost bin. It fits in its place by forcing a little.
The holes of this grid will let the worms pass easily from one side to the other while maintaining the soil in the flowerpot.
The plugs have a rubber seal that conforms to the shape of the clay inlets. At this point, I'm already satisfied that the worm compost bin is well protected from flies (if you have concerns about flies, read this article)!
On each of the 2 corks, it is indicated where to place it: at the top of the supply tank and at the bottom to close the collection hole.
The assembly is very fast and within the reach of all, there is not even need for tools!
Installation
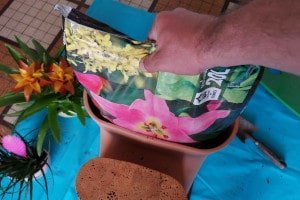
Before filling the composting flowerpot, it is best to find a place for it. Indeed, the empty pot already weighs about ten kilos.
Keep in mind that you will have to fill it with potting soil, add plants and wet bedding with worms. It will be even heavier once it is active.
Find its location and get to work!
I advise you to place it near the kitchen to facilitate the evacuation of peelings and other leftovers.
Prefer a place that is good for plants (more or less light, space, etc).
Make sure that it does not clutter up a passageway, or that it does not suffer from shocks that could weaken it.
At home, it found its place between my desk and the kitchen, next to the fridge.
For the filling of the flowerpot part, plan 20 liters of potting soil. Indeed, the pot has a large capacity. Even large plants can be placed in it.

Discover the concept of this composting flowerpot on the Transfarmers website!
The start-up
Filling the flowerpot
The flower pot is empty
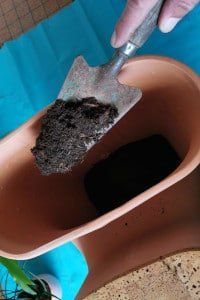
Beginning of filling
We speed up
The flower pot is filled
Choosing the right plants
Let your imagination run wild!
The guide provides a few examples, but it's up to you to adapt according to your desires.
For my part, I first chose plants a bit at random, then I added a good old spathiphyllum which will certainly like it and will grow quickly.
The future will tell us how the other plants will adapt...
Don't forget to water the plant when you install it so that the potting soil can "stick" to the root ball. Afterwards, watering will be less frequent. Once well started, the humidity brought by the fresh waste diffuses partly in the flowerpot part. The plants therefore benefit from this "constant" supply.
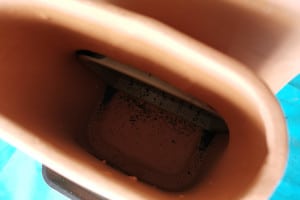
Moving the worms in
I made sure to get it started by adding a large amount of worm bedding. I put in about 8-10 liters taken from the different trays of another worm compost bin that was working very well.
I added some waste, but not too much, a little cardboard, some eggshell powder, closed it and it was ready to go!
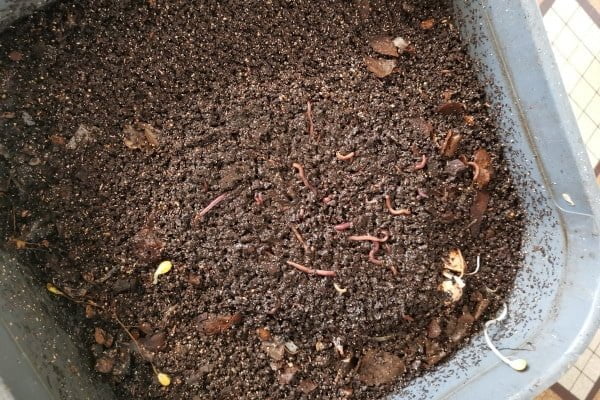
Original Litter

Placement of worms

Result with plants
I admit I didn't take any chances with the amount of bedding and worms. I hope to accelerate the test period to harvest vermicompost fairly quickly.
With less bedding and worms, I will have to be careful to moderate the food intake at the beginning.
Even with a large quantity of litter, there is still a lot of space in the "input tank".
I therefore advise you not to hesitate to make a very voluminous litter (with cardboard, compost) and very humid to welcome your worms in the best conditions. The clay of the pot will absorb part of the humidity: you will have to watch that the litter does not dry out too much during the first weeks.
The flower pot fits very well next to the desk, against the fridge.
It is really a flower pot that will embellish any interior.

Assembly, filling, plant and worm installation are really simple.
The weight of the set requires thinking about the final location before putting it in place.
Transfarmers also offer the purchase of worms with the composting flowerpot. Otherwise, just use Plus 2 Vers!
Daily gestures
The capacity of the worm compost bin is suitable for a typical family!

But what is a typical family? For a worm compost bin, it depends mainly on the quantity of vegetable waste produced by the family, thus on the type of consumption.
There are 4 of us in the household and our vegetables come from a local producer, which means an important quantity of tops, peelings which feed the worms.
For the test, the worm compost bin receives only a part of our waste (the rest goes to feed another worm compost bin). The contributions correspond to a more classical family (3 persons, less waste).
The following observations are made after several months of normal use.
Adding waste

I've been used to using a tray worm compost bin for years, with which you lift a large lid to spread the waste over a wide area. In this case, the entrance to the feeder tank seemed very small at first. But I quickly realized that I had a distorted view due to my ingrained habits.
I have asked different people who know nothing about it to empty a plate of peelings, or to throw away an apple core... and everything goes very well. Indeed, after a few weeks of use, we realize that we add the waste easily and without putting it everywhere.
You just don't want to put in a large amount of waste at once because it's not obvious. It is therefore easier to add the waste as you go rather than storing it in a box.

Placed in the kitchen, the worm compost bin becomes even more practical to get rid of its peelings!
From experience, I prefer to fill it up slowly.
With limited inputs, the litter level rises only slowly, which is logical since decomposition reduces the volume and there is a theoretical transfer to the flowerpot part.
With a series of more voluminous inputs, the level rises very quickly, a sign that too much waste is being put in, which will not have time to decompose normally. This is where there is a risk of fermentation as with any model.
So always be careful to respect the rhythm of your ecosystem by regulating the inputs or by taking breaks after large inputs.
Harvesting Worm Compost
The principle of this model is based on the exchange of nutrients between the worm compost bin and the plants.
Here the worm compost directly benefits the plants. There is therefore less worm compost to harvest than in the classic tray models.
The harvesting hatch reveals the interior directly. Litter and worm compost do not fall out when you open it. You can see the worms working at this level.
When the contents behind the harvesting hatch are uniform, the worm compost is ready to be harvested.
Closed harvesting hatch
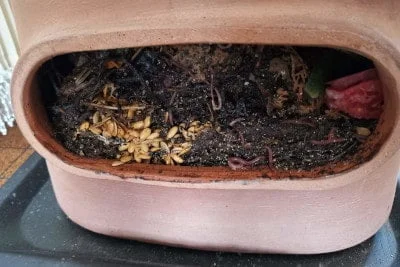
Open harvesting hatch
We see the worms at work. Here the level is still low, the waste not all decomposed.
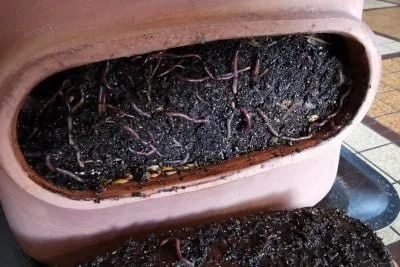
Open harvesting trap
Here the waste is decomposed. The worm compost is ready for harvesting.
Harvesting is done by removing the worm compost from the bottom of the feeder tank through the harvesting hatch. Since there is no separation between the waste levels, the worm compost must be collected from the bottom of the tank with a spoon or small tool.
It will take some time before the first harvest can be made.
The first step is to protect the soil from any dirt.
By leaving it open for a few minutes, the worms will leave the accessible space. This works best in the sun.

We take a little of the mature worm compost and wait a few more minutes for the visible worms to hide.
The bedding (with the worms, the waste...) stays in suspension quite well during the harvesting process. This allows access to the bottom of the tank to harvest the worm compost.

Management of the worm compost bin
For worm composting to work properly, the basic principles must always be followed:
- manage acidification by regularly adding eggshell powder ;
- add cardboard to bring carbon (balance the C/N ratio) ;
- avoid subjecting the worm compost bin to extreme temperatures.
Check this page if you need a reminder.
The corks with their rubber seal are effective and really don't let anything through (I had my eye on them the first few weeks). No smell, no bugs coming to keep you company.
Care must be taken not to overload the worms. The worms' working space is smaller than in worm compost bins with trays, in which you can easily spread the input over the entire surface.
It is also important to use thick pieces of cardboard to help aerate and structure the worm compost, but this advice applies to all worm compost bins.
Finally, I advise to open the collection trap from time to time to check the state of decomposition and to make sure that everything is fine (smell, humidity...).
We even tested the vacations and the heat wave!
The worm compost bin was away for 15 days and there was nothing to complain about when we returned, even though it was very hot during that time (but the composting flowerpot was not in direct sunlight).
During the very hot weather, I checked to see how the system was doing: I felt like the worms were super cool in the clay composter. No sign of stress on the worms inside.
To learn more about the history and commitment of Transfarmers, click here!
The evolution of the composting flowerpot
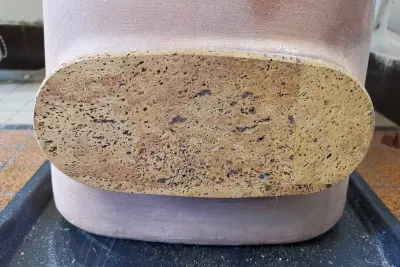
Color changes
Comme annoncé dans le guide fournit, la terre cuite va “vivre” avec l’humidité, la température… et ses couleurs peuvent évoluer.
This is the concept of Wabi Sabi, which gives us a new look at the imperfections of time.
The color of the composting flowerpot evolves a little with time. We notice after a few weeks of use the appearance of white and dark spots.
The white spots are due to the crystallization of minerals present in the earth of the pot and are easily removed with water (+ vinegar if necessary). The dark spots are the mark that the clay pot lives. It changes color according to the humidity... It is almost a chameleon!
After 2 months:

After 4 months:

How are the plants?
The first plants I put in place are still alive! But I quickly realized that they were not made to grow quickly and stay pretty for very long.
So I added a spathiphyllum that likes rich soil, doesn't require much maintenance and grows easily in my home.
The spathiphyllum is in great shape and has quickly taken advantage of its new location. What's convenient about it is that you can see when it's thirsty. And it seems to benefit from the humidity of the system as it requires less watering than its counterpart in a simple pot.
We will see how this little forest develops.
The plants in the composting flowerpot clearly require less watering than those in conventional flowerpots.
Would the composting flowerpot be a solution for those who do not have a green thumb?

The plants, 2 months after their installation.
The cohabitation with the composting flowerpot
It's been several months that he is installed next to the desk and so I spend a lot of time with him.
Nothing to say, everything is going well! The worms are not noisy and even always ready to listen to me if needed. Perfect colleagues!
This new flowerpot is not more noticeable than that, it fits as well as a classic flowerpot.
My impressions
The composting flowerpot easily finds its place in any interior.
In addition, it is customizable with an infinite choice of plants!
It has enough capacity for most families.
The plants benefit from the worm compost and there is some left over for other plants.
I can imagine it in the homes of people who don't like plastic worm compost bins or who want discretion, or in offices next to the "cafeteria area"...
A model manufactured in an environmentally friendly way, which I am sure will meet the success it deserves.
Nous toucherons une petite commission si vous suivez les liens de cet article pour acheter chez notre partenaire.


Very interesting